A Good Start

Our first two days on the Ouachita Trail (which, by the way, I learned I had been mispronouncing – it’s pronounced like “washita”) were hard and cold but lovely.

9B7FAD7D-6F66-496E-B3DB-7F76D726ADD3
The Adventure Begins!

Our Lyft driver fom Little Rock (the trail starts in Pinnacle Mountain State Park, about 20 miles west of  Little Rock) was very talkative – we were her last ride before her weelky rehab session. It was cold (low 30’s) but promised sun and we were excited to be starting.

After a lovely 14.1 miles of slowly warming weather and fairly easy terrain wee “stealth” camped (the “official” campground is a mile off the trail and no water) near a creek.

F6C0E75C-7689-4D6F-BEC9-9343FA7C8496
Our First Camp Site

We continued west around the north side of Lake Maumelle on the second day.

1DDE3B42-1201-46B0-8405-A77395143A32
Lake Maumelle

Another lovely day in nice weather (sunny but still cold – highs in the 40’s) and, after 14.5 miles (and 30 minutes spent finding the trail at one point) we camped near another small creek.

Water was plentiful the first two days so we all carried about 2L for the day and filtered water in camp each evening.

It got cold early though, temperatures dropped precipitously after 4:00 so we were all in our sleeping bags early.

Gear

With two weeks to go before heading out on the trail here is our “final” gear list. My base is a pound higher than I like but most of that is due to the additional winter clothes and the fact that I am carrying a two-man tent. Roberta has a comfortable 14 lbs base.

Screen Shot 2018-01-17 at 2.16.47 PM

Tent:  The Saddle 2 is a new tent I got for Christmas. It is the two person version of the Notch which I used on the PCT and in Big Bend.  I’m hoping we like it as much as I like the Notch.  It weights  bit more (the Notch was under 2 lbs) but it is big enough for two people. It has vestibules on both sides for gear.

Screen Shot 2018-01-17 at 1.59.53 PM

Sleeping Bags:  We are both using our old Marmot 20 degree bags.They weigh 2-3 lbs and should be good down to 10 degrees or so (the tent adds 10 degrees).

Packs:  I’ll be using my old  Exos 58 (which has over 800 trail miles on it now) and Roberta will be using a new pack – an REI Flash 45. My Exos stripped down (removed the top pocket) weighs less than 2.5 lbs. The Flash 45 weighs a little bit more but still under 3 lbs.

Cooking:  The plan is to use the little BRS3000 canister stove I used on the PCT. This is a cool little stove that weighs just under an ounce. IMHO  canister stoves are the only way to go.  Alcohol stoves take forever to cook anything. The plan is for Roberta and I to each carry one small (110g) canister. In my experience you can can easily get 14-18 L of boiled water with a small fuel canister so two small canisters should see us through the whole trek.

Cook kit will consist of a mug, spork, lighter, emergency matches and the stove.

8988_IMG_1103
Cook Kit

Hydration:  We will use a 4L MSR Dromlite bladder (4.2 oz) for dirty water and have two 2-L Playpus collapsible bottles (1.3 oz each) for clean water. That gives me a total capacity of 8 L. Roberta will have her 2.5 L Osprey bladder and two 1L Playpus bottles. We will use a Sawyer Mini filter for water treatment and gravity to supply the filter pressure. I used this system the PCT and it worked well – hang the dirty water bag in a tree and filter water while setting up camp or eating lunch. I also carry a collapsable Nalgene bottle to use as a pee bottle at night (too cold to go out!).

2401_IMG_1169
Water System

First Aid:  We’ll carry the usual assortment of  meds (immodium, aspirin, ibuprofen, etc), antibiotic ointment, moleskin and small needles (for blisters). Bert will also have her contact stuff and her back meds.

Electronics:  My iPhone 6S running Guthooks navigation app will be our primary navigation aid. I used Guthook on the PCT and never looked at my physical maps. My phone will also be my backup compass, flashlight, and E-reader. Which makes power important – so I have upgraded to an Anker Power Core 10000 (6.6 oz). It has great power density (over 1500 mAh/oz) and should give me 5 full additional charges. Roberta will have her 6S and an Echine 5200 (4.4 oz) external battery pack. We will also have a SPOT satellite tracker – it weighs close to 5 oz but with limited expected cell phone coverage it adds a little security. And a bluetooth keyboard for blogging. Of course.

1529_IMG_1191
Jason’s Electronics (minus iP6)

Clothes:  This will be a winter hike so we will be taking an extra layer. This is my pack plan. Head: Wool hat, buff. Hands: Heavy running gloves and waterproof shells. Top: Rain jacket (with hood), micro-puff, fleece, lightweight capilene base, running shirt. Bottom: Houdini wind pants, hiking pants, mid-weight capilene base.

968_IMG_1163
Clothes: Left – worn, Right – Packed

OT: The Detailed Plan

Here is our current hike plan, which has us averaging 15-16 miles a day for two weeks with one zero day (Feb 9)  and one nero day (Feb 14, 6.9 miles).

Water

After doing 800 odd miles of the PCT in souther California (especially during the 2015 drought year) I am a bit paranoid about water. Thru-hiker resources for the OT are primitive (compared to the PCT) and the water info is a good example. The FOT website has a water report ( http://www.friendsot.org/index_htm_files/OT_Water_Sources-rev_2016-12-12.pdf ) but it is not updated very often (the report date says it was last updated in January of 2017!) unlike the PCT water report which is dynamic and updated almost daily, allowing hikers to post new info as they experience the trail. The FOT website suggests stashing water at certain places, which is fine for a 2-4 day section hike but really is impractical for a thru hike.   The plan has a few places where water could be a problem and we will just have to be careful.

Navigation

We plan on using the GutHook navigation app on an iPhone as our principal navigation aid. I used it on the PCT and never looked at the paper maps I had   brought. The trail is supposed to be well blazed (at least for most sections) so keeping to the trail should not be a problem. Of course we will have a compass and electronic maps for backup.

OT: Key Dates

The OT runs from just west of Little Rock to Talihina (Ok).  Our plan has us doing the trail from East to West. There are two main reasons for this – ease of access to the start of the trail and the fact that the eastern end is a little flatter (so we can have a few easier days at the start).  We also would have the advantage that Francis could pick us up after we finish (Talihina is about a 3 hour drive from Norman).

We have purchased our plane tickets to Little Rock so we are committed! Here are some key dates for our planned hike:


OT: General Thoughts

After doing a bit of research looking for  a “longish” hike (2-3 weeks) for early spring (February) as part of our training for Patagonia and also just to get back into the woods, I came up with two possible options: (1) the first 300 miles of the Arizona Trail (AT) from the border to Superior (just East of  Phoenix) or  (2) the Ouichita National Recreation Trail (OT).

The profile comparison (below) shows one of the main reasons for picking the OT – it is both lower in elevation and has fewer big climbs.  This is important for a late-winter hike since the weather at higher elevations can be problematic.

Speaking of weather the February trail averages look pretty good – low 50’s for the highs, high 20’s for the lows. If historic averages hold the weather should be perfect for hiking. Of course a late winter storm could totally change that.

The Haute Route

HR Day 3
Day 3, Typical Haute Route View

We have finished the Haute Route from Chamonix to Zermatt. We did roughly 85 miles over the past nine days, our longest day was 14 miles and we usually did 9-10 but that really doesn’t mean much – what really mattered were the climbs and the passes or cols we had to transit each day. We ascended more than 20,000 feet (6,000 meters), some of it quite steep.

HR Day 3-2
Climbing out of the valley on Day 3 (yes, we did start down there)

The views were stunning – words really don’t do it justice. We spent most nights in hotels in small alpine villages or ski resorts but also two nights in mountain huts. Very few people use tents, not sure if that is discouraged or just not done. Pretty much everyone stays in the huts on those sections where hotels/hostels are not available. The huts have big dorm rooms (10-16 beds per room), a flush toilet (or two) and a single shower (or two).

HR Day 3 - Hut 1
Our group’s dorm room in our first hut

The huts we stayed in can sleep 50-60 people and were very nice. Our group consisted of 12 hikers and 2 guides, though one of our group decided not to hike after the second day when he realized he could not keep up.

HR Day 4 - Hut 1 View
Our first hut

A note on the “Haute Route”. There are really many variations. Some people hike every mile from Chamonix to Zermatt, about 110 miles. This takes most people 12-14 days (at least). The Alpenwild variation has all the major passes (or cols) and most of the great views, bypassing some of the valley slogs, and using some conveniently placed chair lifts and gondolas (a good part of the route is in ski country) to get the hike down to 11 days (9 hiking days, an acclimation day at the start and a rest day at the end).

Day 4 - Col 2
A typical mountain pass – day 4 – our group resting at the top

And, of course, the big plus using a guide service was that our bags were ferried from hotel to hotel. So, except for the hut nights, we only had to carry our foul weather clothing, water and snacks. Speaking of weather, we had nine glorious days – sunny or partly sunny the whole way.

As I type this in Zermatt it is raining and 49 degrees (with a chance of snow this weekend!), so we were very fortunate. And it is hard. We had a pretty fit group and the tough climb days (>3500 feet) were tiring. Our age range was 55 to 70 with most of us being around 60. We were mostly Americans, with a couple of delightful Aussies thrown in for variety. Most of the passes were 9,000 to 10,000 feet and most nights were spent below 7,000 feet.

Day 4 - Col de Prafleuri
Col de Prafleuri, Day 5

We joked that the Swiss have yet to discover switchbacks. And 90% of the trail is either ascending or descending, there are almost no flat sections. Everyone was tired but the time we got to Zermatt. We ate breakfast/dinner in the hotel/hostels/huts and lunch was usually a wonderful picnic supplied by our guides (cheese/meat/bread/fruit/chocolate) and we ate a lot – hiking 6-8 hours a day burns a lot of calories.

Day 9 - Typical Lunch
Typical lunch spread

Water was plentiful (most of the time) and we drank it straight from the streams/rivers without treating or filtering. And there were (almost) no injuries!

Day 7 - Injury
Roberta attacks Switzerland with her knee. Switzerland wins.
Day 9 Lunch View
View from our lunch spot on day 9
HR Day 7 - 1
…and did I say the views were stunning?

The Last Lock

Sadly, after 12 weeks we are back in Joigny to begin cleaning up the boat and preparing to move on…..

Joigny Aug 11 - 2
12 weeks later and back in Joigny!

The day started cold and foggy (49 degrees in August!) for our short motor to Joigny. We were joined in the last locks by two other boats, what looked like a converted barge (more on that later) and a Le Boat rental. The last lock was fun…when we noticed as we were locking down that the Le Boat seemed to be hung on the bow. We tooted our horn to get the lock keeper’s attention before their stern went under water (at which point, the boat sinks and we all are stuck for a good while).

Hung Up 2
Two very clueless Le Boat people and a hung boat.

So, the alarmed lock keeper closed the gates and cycled the lock again to float the boat off.  All went well and the boat came clear but as we started to cycle down again they appeared to be doing the same thing before the lock keeper came up and explained that a stern line was needed as well as a bow line and basically stop being idiots.

Hung Up 1
Another view of the hung boat.

The other boat in the lock was a custom barge owned by a South African couple and they are looking to sell.  We had time to talk as the lock was re-cycled.  They are asking 195,000 Euros and they invited us to stop by and see the boat in Joigny. Lovely but maybe a bit big for us (20 meters).

Screen Shot 2017-08-11 at 7.27.38 PM
We visited the barge, then their web site.
Joigny Aug 11
The view of Joigny from our mooring

Nearing the end….

After nearly 12 weeks, 1500 Km and 640 locks we are nearing the end of our Burgundy barging adventure.  Amazingly enough we have followed the plan we created many months ago, covering nearly all the navigable waterways of Burgundy. Also amazingly, after living for 12 weeks on a 11.6 m by 3.8 m boat we are still talking to each other and are sad to be leaving “Bray Sur Somme”.

Screen Shot 2017-04-12 at 4.30.40 PM

We did the Canal de Bourgogne, the Canal du Centre, the Canal de Roanne, the Canal lateral a la Loire, the Canal de Briare the Canal du Loing and the Canal du Nivernais (twice), along with bits of the Yonne, Seine and Saône rivers.

Our biggest concern now is that we appear to have a goodly amount of quality wine that must be enjoyed before we leave the boat. How will we manage to fit Martini Night in?

The Locking Life

Thought I would do a post about locking since it is something most people are unfamiliar with and we get a lot of questions about it…

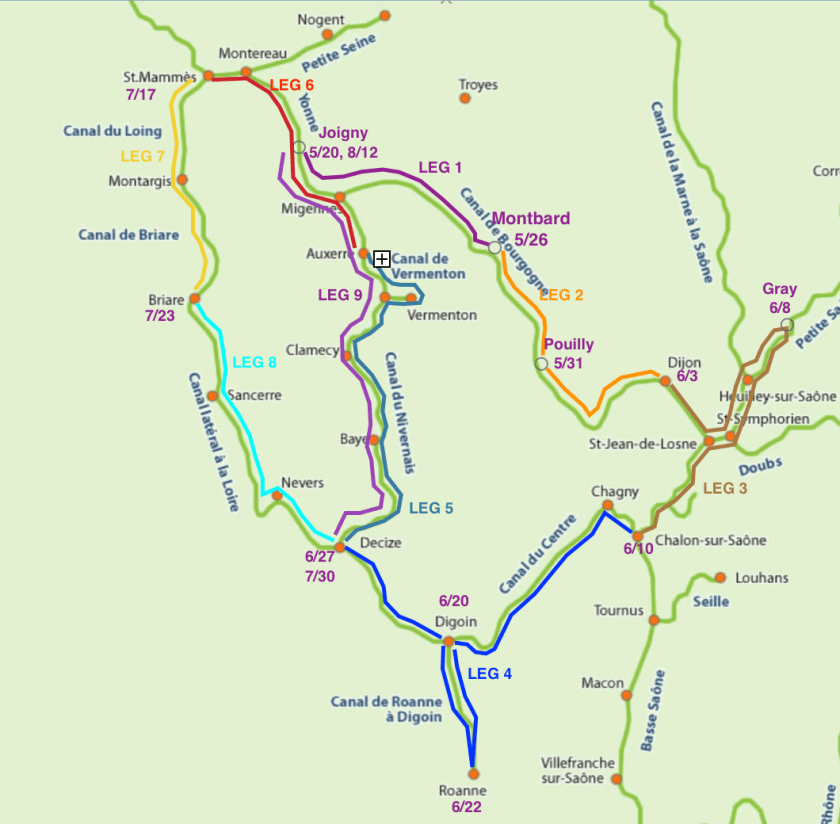
The locks allow canals to traverse varied terrain in a controlled manner.  The canals connect various river valleys (i.e. the Canal du Burgogne connects the Seine with the Saone) passing over the intervening hills. The locks allow boats to climb mountains!

Each lock consists of two sets of doors and two sets of gates, usually part of the doors,. The doors allow the boats to pass, the gates allow the water to pass. To ascend a lock, with both sets of doors closed and the lock full, the lockeeper will open the lower gate allowing the water to flow out of the lock. When the water in the lock has reached the lower canal level, the lower doors are opened allowing a boat to enter the lock. The lower doors and gates are then closed and the upper gates opened, allowing water to flow back into the lock from the upper canal. When the lock level reaches the upper canal water level the upper doors are opened allowing the boat to exit. The process is repeated in the opposite direction to descend.

Some of the locks are completely manual, with the lock keeper (with sometimes help from a boat crew member) cranking open the doors and gates. Some of the locks have hydraulics to open the doors and the gates are manual. Some have manual doors and hydraulic gates and yet others are fully hydraulic with the lock keeper standing at a control panel. And yet others are completely automatic with no lock keeper present, relying on the boat operators to initiate the lock cycle (usually with a pull cord located outside the lock to request access and another pull cord inside the lock to begin the cycle). You really never know when approaching a lock what you will find.

A lock cycle can take anywhere from 5 minutes to 20 minutes (or sometimes much longer if there is a line of boats waiting or you have a particularly loquacious lock keeper).

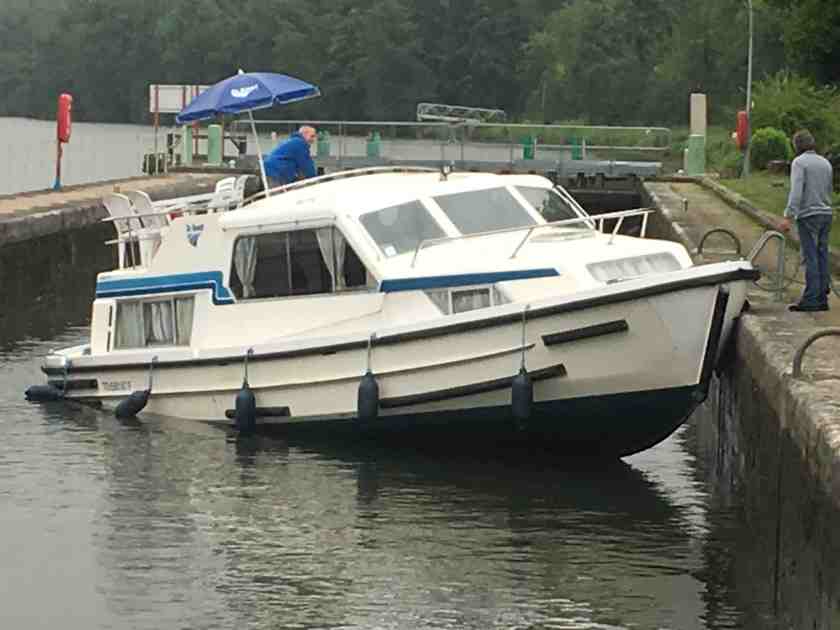
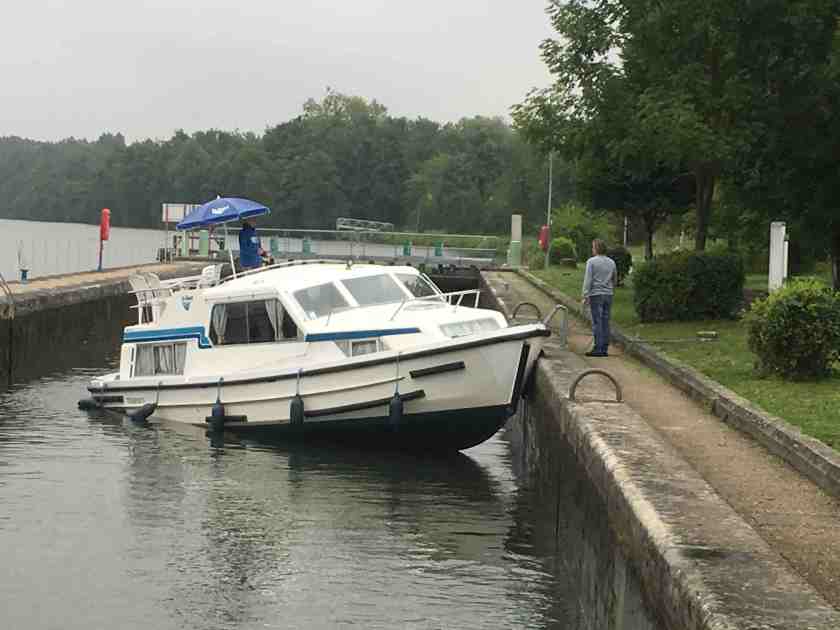
A word about the size of the locks  in Burgundy. They vary in length in the canals, from 30m long in Lock #15 on the Canal du Nivernais up to 40m on the Canal de Roanne, but most are a “standard” 38.5m (126 ft). The widths are all about 5m (16.4 ft).  Our boat is 11.6 meters by 3.8 meters. We have been in locks where the lock keeper squeezed in three boats our size – 35 m of boats in a 38 m lock!    The picture shows our boat to scale in a standard lock.

Screen Shot 2017-07-28 at 3.53.30 PM

In the rivers the locks are much bigger because there is still significant commercial traffic. The biggest lock we have been in was the Seine Varenne lock, 220m long by 17m wide. The second figure above shows a to-scale plan of the Seine Varenne lock and our boat.

The depth of the locks (how much the boat rises or lowers) various dramatically. We have been in the 10.7 meter (35 feet) Canal du Centre lock off the Saône and in a 0.48 meter (1.5 feet) lock in the Canal du Nivernais but they are typically 2-4 meters. In the deeper locks, going up, the lock keeper usually lowers a hook to take your line to attach it to a bollard on the surface. Some of the deep locks have floating bollards that go up with the boat.

Locks are really very simple and quite safe. The only really bad thing you can do is tie off your line to the boat (rather than holding it loosely). When locking down, if the line is cleated, the boat will “hang” as the water level drops. I’ve seen this happen and it is quite scary. The boat ends up hanging off the line until either the line is cut, breaks or the cleat pulls out of the boat. The boat then drops the 5-10 feet to the water. Once the boat starts to hang, the line cannot be released, it has to be cut. Most of the regular cruisers carry knives for this purpose or have one very handy.

Here is a sequence of a boat locking up (ascending from a lower canal level to a higher canal level):

Lower doors open, boat enters lock.


Lower doors closing behind boat(s)


Upper gates open, lock filling.


Up lock doors open, boat exits lock at the higher level.

And here is a sequence for locking down. Note that this is an “automatic” lock – there is no lock keeper.

Approaching automatic lock, cord (~100m from lock entrance) is pulled.


Doors open and boat enters lock

Crew jumps off boat, after securing line, pulls the lock initiation cord.


Upper doors close behind the boat(s).


Lower gates open, lock empties to lower canal level.


Lower doors open, boat(s) exit lock.